Friday, August 15, 2008

Bolognese Puffs

Whoever said food is just food is either dull and uncreative or never had anything besides spaghetti-in-a-can. Nothing is a 'just'. No one is a 'just'. Food and people are exactly the same. What we are on the inside, we create and express to the external. Art, music, stories are no different from cooking.

So I salute all you food bloggers out there. You and your best friend - the camera.

My copy of Donna Hay finally arrived in the mailbox. I particularly enjoyed their osso busco recipe which I've adapted into ragu - Italian tomato-based meat sauce. It's hearty, wholesome and 'hmmm-so-good-for-the-soul'. Now, the twist to this is that you can have it in many ways. I've put it together with puff pastry and it's absolutely delicious! I couldn't wait to get it into my mouth. Which unfortunately did very little good to my mouth. :(

Home-Made Bolognese Sauce
--------------------------------------------------------------------------

  • olive oil
  • 1 brown onion, diced
  • 4 cloves garlic, chopped
  • 800g mince
  • plain flour, for dusting
  • 1 cup dry red wine
  • 1 can chopped tomato
  • 1 cup water
  • 1/4 cup tomato paste
  • 5 bay leaves
  • 1 tbsp brown sugar
  • sea salt
Method:
  1. Heat olive oil in a pan over medium heat.
  2. Add garlic, cook until fragrant and then add the onions. Stir till onions are slightly transparent and then remove from pan.
  3. Add olive oil and increase heat to high.
  4. Dust the mince in flour and cook until brown. Add the onion and garlic back in the pan.
  5. Gradually add the wine, scraping the bottom of the pan. Cook for 1 - 2 minutes or until liquid is reduced by half.
  6. Add tomatoes, paste, water, bay leaves, sugar and salt. Stir to combine.
  7. Leave to cook until sauce is thick (approximately an hour).
To assemble: You need one sheet of puff pastry. Cut it into half. Add ragu on one side of pastry. Fold it. Seal it by pressing down the edges with a fork. Brush some milk on it and put it in a preheated oven of 180C for 15 minutes. Remove from oven, be careful, as it will be very hot, and sprinkle some cheddar cheese on top. Return the puffs in the oven and bake for another 5 - 10 minutes or until cheese is melted and golden.

Thursday, August 14, 2008

Cherry Pie


Do you love cherry-stained smacking lips? You do? You do? Well, get out of here and grab yourself a bucket for some happy-tra-la-la-la cherry picking! If you're a super cherry enthusiast, you'll even have not one ...(wait for it)... but TEN sticky red juicy fingers! Don't forget to spit out those pits. Make it fun! Make it naughty. Stick it in a straw and pit shoot your nasty neighbours.

I love cherries. I go crazy with cherries. I so l-u-r-v-e cherries.

It's not cherry season yet but they had some imported from the U.S. (you lucky people). The other week, I was craving for apple pie and Mr. G wanted cherry. So I bought granny smiths and cherries to have double the pie glutton! Oh why not? There's always spring to lose the winter weight.Cherry Pie ( serves 8 )

——————————————————————–

Sweet Shortcrust Pastry (adapted from Donna Hay)

  • 2 cups plain flour
  • 3 tbsp caster sugar
  • 150g cold butter, chopped
  • 2-3 tbsp iced water
  • one egg, beaten
  • sugar to sprinkle

Filling:

  • 4 (approx. 920g) cups cherries, pitted
  • 1 cup sugar
  • 1/4 cup flour
  • 1/2 teaspoon cinnamon

Method:

  1. Preheat the oven to 180C.
  2. Put flour, sugar and butter together.
  3. Combine everything with fingers or in a food processor until it resembles fine breadcrumbs.
  4. Add enough ice water to form a smooth dough.
  5. Knead the dough, wrap in a plastic wrap and refrigerate for 30 minutes.
  6. Mix ingredients for filling.
  7. Roll out pastry on a lightly floured surface or between non-stick baking paper until 2 - 3mm thick.
  8. Line the tart tin.
  9. Put top crust on. Cut vent slits in top crust.
  10. Brush with egg and sprinkle with sugar.
  11. Bake for 30 minutes or until crust is a golden colour.

Wednesday, August 13, 2008

Apple Pie

This didn't turn out the way I'd wanted it to. It was my first attempt at making pie from scratch (- which means no cheating with the base!) and I didn't really know what to expect. It didn't turn out badly, just, lumpy. I reflect that it might be from a few things:
1. I didn't refrigerate the dough for 20 to 30 minutes which was vital for the dough to harden and bind.
2. I didn't have 1.5 kg apples and used less.

So this is what happened: the dough was so soft that it fell apart before I could put it into the pie tin. And because there was less apples than required, it was a rather lame, lumpy looking pie.
Thank goodness it tasted fine because it was KK Tuesday. And Tuesday is a mini family reunion at G's place. Everyone comes back from where they are have gather round the family table to catch up. It's a rather nice atmosphere. Full of stories, laughter, jokes, silly things and always makes me feel a little less homesick. :)


Apple Pie ( serves 8 )
—————————————————
Ingredients:

For Pastry:

  • 1 cup self-raising flour
  • 1 cup plain flour
  • 1/2 tsp salt
  • 150g butter, cold and chopped into small cubes
  • 1/4 cup caster sugar
  • 1 egg
  • 1 tbsp cold water
  • an egg yoke
  • 1 tbsp milk
  • 1 tsp flour
  • 1 tsp sugar

For Pie Filling

  • 1.5Kg Golden Delicious or Granny Smith apples
  • 1 cup water
  • 3-6 Cloves (whole) or 1 tbsp of ground cinnamon
  • 1/4 cup caster sugar
  • 1 level tbsp plain flour

——————————————————–
Method:
——————————————————–

For Pastry

  1. Sift flours, sugar, butter and salt into a mixing bowl.
  2. Rub the butter and flour with finger until combined.
  3. Add egg and water mixing quickly into dough.
  4. Press the mixture together with hands.
  5. Knead lightly with a little extra flour.
  6. Set aside and refrigerate for 30 minutes.

For Pie Filling

  1. Peel, core and slice apples.
  2. Place apples into a large saucepan with water and cloves (or cinnamon).
  3. Cover and simmer over a low heat for 10 minutes.
  4. Shake the pan occasionally until apples are tender, not soft.
  5. Drain the excess liquid. Set apples aside to cool.
  6. When cool, remove the cloves.
  7. In a bowl, mix the apples with the sugar and flour.

To Assemble:

  1. Preheat the oven at 190C (375F).
  2. Divide the pastry into two-thirds and one-third.
  3. Roll out two-thirds of the pastry on a lightly floured surface until 3mm thick.
  4. Place it in a shallow 22cm pie tin.
  5. Fill with the apples.
  6. Brush the milk on the edges of the pastry
  7. Roll out the remaining pastry to fit over the top of the pie.
  8. With the fork (dusted in flour), press the edges of the pie to seal firmly.
  9. Cut the excess pastry with a knife.
  10. Brush the top of the pie with the egg yoke and sprinkle with sugar.
  11. Place in the oven for 30 minutes, or until golden and crisp.

Wednesday, August 6, 2008

Chocolate Brownies with White Chocolate Topping

Chocolate cravings were calling out and since P. was back from his trip from North Pole (ok, close to the Antartic to be precise) I thought I made some brownies for him and for my weekend getaway to Portland. Pictures here (and if it's not there then it's coming soon). Surprisingly the beach wasn't too cold. The warmth of the locals made up for it and also the wonderful dogs! I've never seen happier dogs!

I've got such a soft spot for animals. When I was growing up, we had two adult dogs and seven puppies. Mom wasn't too happy about being the lone person responsible for all the pets and so one day when the kids were at school, she gave the puppies away. We were left with a fat little puppy, which I refused to let go off, his mom, Lucky, and a beautiful white male, Rex. After the dogs died of old age, we had three chicks (which didn't live very long) followed by, two cats - Snowy and Ruby, and much later, goldfish.

I've always wanted rabbits but never had them. Once, a hawk got caught in our roof and although it was a vicious thing, it was smart and fascinating. It's just too damn bad I can't have any in my little apartment now. Sigh.

Chocolate Brownies
———————————————————-
185g butter, melted
1/4 cup cocoa butter, sifted
1 cup caster sugar
2 eggs
1 cup self-raising flour. sifted

Method
1. Preheat the oven at to 160c (325f).
2. Place the butter, cocoa, eggs, sugar and flour in a bowl and mix until smooth.
3. Spoon into 20cm (8 in) square slice tin (buttered).
4. Bake for 45 - 50 mins or until skewer comes out clean when tested.
5. Remove from oven and let it cool.
6. Melt white chocolate in microwave for 1 minute. Remove, stir and reheat for another minute.
7. Spoon the white chocolate over the brownie really quickly using back and forth strokes - not unlike sifting flour or using a Wii controller. :P

8. Let the white chocolate cool then cut and serve.

Friday, August 1, 2008

White Chocolate Lemon Cupcakes with Lemon Cream Cheese Frosting

I have to apologize for the lack of activities on Twenty Something recently. I'm now occupied with Project Mr. G. It's taking up a lot of my time because I'm too busy having fun. I'll be a little slow coming up with new posts but be patient and in time, I'll pick up my pace again (probably when Mr. G gets up to go to Sweden for 6 months - boo!)

I think I'm quite done with cupcakes. For now anyway. As much as I love them to bits, I think I'm a little OD-ed from it. The cupcakes were for a potluck party I was invited to. Besides J, I didn't know anyone else. To be honest, I was a little apprehensive but hey, what did I really have to lose? And I'm glad that I went anyway because I had a ball of a time and I met some very interesting people.

There were loads of Malaysian food and boy, those spicy dishes made me buzz. You know how it is when you bite into a chili and after the fiery aftermath your brains goes into this hyperbuzz that gives you a certain high? Well, I was on a high for sure.

I used to be able to take chili and lots of it. My family and friends can vouch for that. They think I'm mental when it comes to those tiny edible grenades. But since moving to Melbourne, my tastebuds have retired from its chili days and decided to chill. It's a little embarrassing actually. I don't exactly know how that's even possible but I guess it is.
Lemon & White Chocolate Cupcakes with Cream Cheese Frosting
----------------------------------------------------------------------------------
Ingredients:
  • 100g butter, softened
  • 1/2 tsp vanilla essence
  • 1/3 cup caster sugar
  • 2 eggs
  • 1/3 cup milk
  • 1 cup self-raising flour
  • 1/4 cup plain flour
  • 1 tsp lemon rind
  • 1 tbsp lemon juice
  • 1/2 cup white chocolate, roughly chopped
Cream Cheese Frosting:
  • 30g butter, softened
  • 80g cream cheese, softened
  • 1 tsp lemon rind
  • 1 1/2 cups icing sugar
Method:
  1. Preheat oven to 180C. Line muffin pan with paper cups.
  2. Beat butter and sugar until light and fluffy.
  3. Add eggs, beat in one at a time. Add essence.
  4. Beat in milk and then sifted flours, gradually in batches.
  5. Fold in white chocolate, lemon juice and rind.
  6. Divide mixture among cups and smooth the surface with the back of a spoon.
  7. Bake for 30 - 35 minutes or until skewer comes out clean. Leave to cool.
  8. Prepare frosting.

Cream Cheese Frosting:
Beat butter, cream cheese and rind in a mixing bowl until light and fluffy. Gradually beat in sifted icing sugar. Decorate cupcakes.


For the Chocolate Mars Bars Cupcakes with Whipped Cream recipe, click here.


Get paid to review my post - Read here for more details.

Friday, July 18, 2008

Cherry Ripe Chocolate Cupcakes

The girls and I are having a pizza & chic flick night. A rampage of emails usually fly back and forth a few days before because everyone’s excited to meet up. I personally think it’s so important for people to have their night with the girls or with the boys - depending on which company you’d prefer. Friendships are incredibly precious things to me and I’m fortunate to be surrounded by good people.

I’ve been thinking about making these cupcakes for a long time. And in Impatient Vocabulary, one week is a long time to wait. I run the process over and over again in my head and when I have a firm picture, things always go well. That’s me exercising visualization. Now, to visualize, money flowing into my account.

I am very pleased with the cupcakes as it came out fluffy and light. If you don’t have Cherry Ripe, not to worry, there is a substitute recipe. And I promise you, it’s just as good.

Cherry Ripe Cupcakes (makes about 18)
—————————————————-----------——

  • 125g butter, softened
  • 1/2 tsp vanilla essence*
  • 2/3 cup caster sugar
  • 2 eggs
  • 1/3 cup milk
  • 1 cup Cherry Ripe chocolate, chopped
  • 1 cup self-raising flour
  • 1/4 cup plain flour

———————————————————–

No Cherry Ripe? Replace it with:

  • *1/2 tsp coconut essence (instead of vanilla essence)
  • 1/2 cup dessicated coconut
  • 1/3 cup red glace cherries, chopped coarsely
  • 50g dark eating chocolate

———————————————————–

Milk Chocolate Ganache

  • 1/4 cup cream
  • 100g dark chocolate, chopped coarsely

Decorations

  • 150g white chocolate Melts, melted
  • pink food colouring

Method:

  1. Preheat oven to 180C / 160C fan-forced. Line muffin pan with paper cases.
  2. Beat butter, sugar and essence in a bowl until light and fluffy.
  3. Incorporate eggs, one at a time.
  4. Fold in milk, cherry ripe chocolate (or coconut, cherries and chocolate).
  5. With an electric mixer, beat in flours.
  6. Divide mixture among cases and bake for 30 minutes or until skewer comes out cleanly.
  7. Remove from oven and allow to cool.

Chocolate Ganache:

  1. Bring cream to boil in a small saucepan; pour over chocolate in small bowl, stir until smooth.
  2. Cover bowl; stand at room temperature until ganache is spreadable.

Decorations:

  1. Melt white chocolate in a double boiler.
  2. Tint it with food colouring according to your preference.
  3. Make paper piping bags; spoon the chocolate mixture in and pipe coloured heart shapes onto baking paper-lined oven tray. Set in a cool dry area.
  4. Wait for ganache to cool before setting the hearts on the cupcakes or the heart will melt from the heat.

Wednesday, July 16, 2008

Passionfruit Cupcakes

As strange as this may sound, I'm quite unused to blogger now that I'm working more with Wordpress (on Happee Monkee) . I know it hasn't been that long but really, there is that awkwardness when you change systems like for example between a Mac and a PC. I found when I was using Mac, it was rather difficult to switch back to a PC and vice versa. Or it's like, you taking a different route to work - and after two months you switch back - wouldn't it feel a little strange? We're after all, creatures of habit.

I should declare this week to be Cupcake Week. We seem to have a pattern here. And did I tell you that I just bought a new cookbook? All about cupcakes, cheesecakes and cookies! I love it to bits. Before I go to bed, I read it to myself like a bedtime story. Well laugh if you want, but those pictures are really pretty and I want to go to bed in a happy state of mind.

Recipe by Julie Le Clerc

Passion Fruit Cupcake (makes 12)
—————————————————————–

  • 75g butter, softened
  • 1/2 cup caster sugar
  • 1 tsp vanilla essence
  • 2 small eggs
  • 1/4 cup passionfruit pulp (2 fruits)
  • 1 cup plus 2 Tbs self-raising flour
  1. Heat oven to 180C. Grease or line 12 muffin pans with paper cases.
  2. Beat butter, sugar and vanilla together until pale and creamy. Add eggs one at a time, beating well after each addition.
  3. Stir in passionfruit pulp, then fold in sifted flour.
  4. Half fill paper cases with mixture and bake for 15-20 minutes or until a skewer inserted into the centre of one cake comes out clean. Remove to a wire rack to cool.

Passionfruit Cream Cheese Frosting
—————————————————————–

  • 30g butter, softened
  • 80g cream cheese, softened and cubed
  • 1 1/2 cups icing sugar, sifted
  • 2 passionfruits
  1. Cream butter, cream cheese and icing sugar together. Don’t over beat the frosting.
  2. Fold in pulp from one passion fruit. Mix well.
  3. Swirl frosting on cupcakes. To decorate, squeeze some pulp on top.

Tuesday, July 15, 2008

Lemon cupcakes

I was instructed to post something pretty. So here it is.


Lemon Cupcakes
(Yields 40 2oz cupcakes at 19gms per cupcake)

225 gms self raising flour
225 gms butter
225 gms sugar
4 large eggs
1 tsp baking powder
1 tsp vanilla extract
Rind of 1 whole lemon (or more, if preferred)

Put everything in the bowl and beat on high. Try not to overbeat it as this will cause the batter to break. You want to stop when the batter is very fluffy and stiff.

Spoon batter into cupcake cases and bake at 180 Celsius for 20 minutes or till slightly brown.

You don't want to over bake the cupcakes as it was cause the cupcakes to be dry.

Once cool, mix a batch of buttercream and let your imagination run wild.

Finally, Eat.

notes: To make sure you get batter of nice consistency, try not to use butter that has been out too long. Butter that has been out too long will cause the batter to be slightly runny.

Use large eggs to ensure that the cupcakes have enough moisture.

Monday, July 14, 2008

Happee Monkee


Hi folks, I've been working hard over the last 24 hours designing my new site: Happee Monkee.
It's now 80% done and not all the recipes on Twenty Something are there but I'm popping out my skin just to let you know about my very own slice of cyber world. :)
You will be able to view more of my work, photos and stories on Happee Monkee and trust me, there's still lots in me to be shown yet. Thank you for all your comments and support on Twenty Something, don't worry, I'll still be contributing to this site and keeping you updated about my adventures. Cheers! Mabs

Sunday, July 13, 2008

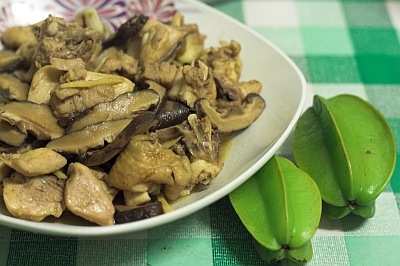
Mushroom Chicken

                       IMG_7947

Aloha! My first post here! My mum went "Nah! Here's the ladle and the wok. The kitchen's all yours". That's how I started cooking. My family had to endured tasteless or super salty food for 2 months, but I managed to get it right after that. And that happened 9 years ago.

Yehhh... so I'm practically a veteran at cooking hurhur. But I don't know any recipes, nor do I refer to any. Too lazy. I'm a veteran at cooking simple and nameless everyday family dishes concocted with whatever ingredients available at that time. Used to cook everyday (*gasp) while I was loafing in uni but nowadays my job only allows me to cook on weekends.

So here's one of my very very simple recipes at home, Mushroom Chicken.

Ingredients (serves 4) :

  1. Quarter chicken, preferably thigh and drumstick part.
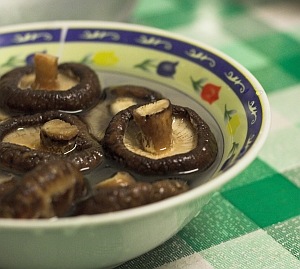
  2. Black Shitake mushrooms (5 pieces or more if you like)
  3. A few slices of ginger
  4. Soya sauce, dark sweet sauce, salt and pepper
  5. Chinese rice wine

Method :

  1. Soak the dry Black Shitake mushrooms for around 2 hours till they soften.
  2. Chop the chicken into smaller pieces.
  3. Marinate it with soya sauce, dark sweet sauce, salt and pepper.
  4. Cut the mushrooms into thin slices.
  5. Squeeze out the water from the mushrooms.
  6. Heat up the wok and put in some oil.
  7. When the oil is hot, throw in the slices of ginger and hear it crackle!
  8. Once you smell the aroma of the ginger, throw in the mushroom slices and stir.
  9. Pour in some soya sauce. The mushrooms will soak up the soya sauce and they will give out a nice mushroomy aroma.
  10. Throw in the marinated chicken and stirfry.
  11. Add in some water and close the lid.
  12. Leave it to simmer for around 10 minutes. Open the lid to stir occasionally.
  13. Open the lid and add 2 table spoons of Chinese rice wine and stir.
  14. Off the fire and dish out to serve.

                        IMG_7951

Saturday, July 12, 2008

Carrots and Baby Corn Porridge


What a tiring and stressful week. Both my youngest sister and my hubby are sick. Both have been sick since Tuesday. My sister was down and still is with cough and flu. And my hubby is down with viral fever, so his body temperature is going up and down like a yoyo from Tuesday till today. It freaks me out as this is the dengue season. Dengue fever dangerous it could be fatal as it reduces victim white blood cells. Fortunately, 2 doctors said my hubby does not have dengue symptom. *Phew.

My sister requested for carrot porridge. I thought that it is boring with just carrot in the porridge. So, I tested out this recipe. I add in baby corns and chinese cabbage. My hubby said it feels weird with the crunchy baby corn, as porridge should be soggy and soft. But they finished the whole pot. :)


Ingredients: (serves 5)
1 medium size carrot (peel off skin and cut into thin strips)
3 fresh baby corns (peel of the husks and cut into cubes)
3 leaves of chinese cabbage
1-2 slices of ginger (optional)
50g of thinly sliced pork or chicken meat
10 tablespoonful of cooked rice
1.5 liter of water
salt to taste

Method:
  1. Add water and rice into a pot. Boil them at high heat for 10mins.
  2. Add in the pork or chicken meat. Leave it to boil for 5mins.
  3. Add in the carrot, baby corns, chinese cabbage and ginger. Leave it to boil for 5mins.
  4. Then reduce the heat to medium - low. Continue boiling for another 30mins.
  5. Constantly stir the ingredients to ensure that the rice (rice will be porridge at this point) does not stick at the bottom of the pot.
  6. Depends on how thick you want the porridge to be, you can turn off the heat at your likings. Add salt to taste.
  7. You can serve porridge with salted duck eggs.

Thursday, July 10, 2008

Baked Chicken Parcels

I live in a pretty nice neighbourhood. We've got a few parks around; trees on the sidewalk; a healthy Botanical Garden just a couple of blocks away and it's all quite breathtaking during autumn. Sometimes I wish I had a dog to walk. Minus the responsibility having to collect it's poop. I'll get Mr. G to do that. :D

My status on Facebook is currently: 'Mable is looking for keen dessert and cake eater.'
It's not that there's anything wrong with the stuff I make. The problem is really about me packing on the extra kilos. I love food but if I'm going to look like Michellin Man, I ain't going to be a very happy monkey.

I hate throwing stuff away. I take after my momma. Actually, come to think of it, both my parents are hoarders. No one throws stuff away. We're like a squirrel family. Anyway, I digress.

Where O where can I find nice people to give my food to?

Here's a two-minute recipe:
Baked Chicken Parcels (serves 2)
-------------------------------------------------------------------

  • 1kg chicken drumsticks
  • 75g oyster mushrooms or shitake mushrooms
  • 3 stalks spring onions (cut into 3cm lengths)
  • Grease proof paper
  • Ginger, thinly sliced
  • Radish, sliced
  • Extra spring onions, sliced thinly, as garnish
Seasoning:
  • 1½ tsp sea salt
  • 1 tsp sesame oil
  • 2 tbsp oyster sauce
  • 1 tbsp white or Chinese wine (optional)
  • 1½ tbsp corn flour
  • 1½ tbsp sugar
  • 2 tsp fish sauce
  • ½ tsp pepper
Method:
  1. Preheat the oven at 250°C
  2. Remove excess fat and skin off chicken.
  3. Marinate with seasoning and leave for 2 -3 hours.
  4. Mix in mushrooms and spring onions.
  5. Cut grease proof into 12cm x 15cm. Fold into envelopes.
  6. In each envelope, spoon in 1 drumstick, mushroom, ginger and spring onion.
  7. Bake in baking tray for 40 – 45 minutes.
  8. Serve with fresh radish and extra spring onions.


Get paid to review my post - Read here for more details.

Wednesday, July 9, 2008

Pear Tarte Tin

I'm going to be a fatty but I don't care. This is mine! A-l-l mine. No one to share it with, no one to give it to. Mine! Mine! Mine! (Evil laughter in the background).

Besides it being so easy to create, this is simply delicious. The cream (whipped by hand - am so proud) blends beautifully with the acidity of the pears and the cinnamon just blows you away. You MUST eat it fresh, piping hot. Even if it meant that you had eat it all in one sitting - you must eat it just as you carry it out of the oven. Get your fork ready and GO!

Alright, alright, if you're afraid of third degree burns then wait 15 minutes if you must. After you've completely finished licking the plate, stand in front of the mirror and sing: I'm beautiful! I'm sexy! I'm strong!

Then you won't feel so fatty anymore.

Pear Tarte Tin (serves 6 or, 1, whichever you prefer)
----------------------------------------------------------------------
* 100g butter, chopped
* 1 1/4 cups caster sugar
* 3/4 teaspoon ground cinnamon
* 6 large beurre bosc or packham pears, peeled, cored, sliced into 12
* 2 sheets frozen ready-rolled puff pastry
* 300ml double thick cream

Method

  1. Preheat oven to 200°C. Grease and line base of a 20cm (base) round cake pan.
  2. Melt butter in a heavy-based frying pan over medium-high heat.
  3. Sprinkle caster sugar and 1/2 teaspoon cinnamon over butter.
  4. Add pears, overlapping slightly so they fit tightly. Reduce heat to medium.
  5. Cover and cook for 3 minutes.
  6. Remove cover. Gently shake pan. Cook, uncovered, for a further 20 minutes or until pears are almost tender.
  7. Remove pears with a large metal spoon. Carefully arrange pears in a spiral pattern on base of cake pan, completely covering surface.
  8. Simmer sauce in pan for 3 minutes or until it turns a deep caramel colour.
  9. Pour sauce over pears so they are half covered. Allow to stand for 10 minutes.
  10. Cut a 24cm round from each pastry sheet. Place on top of each other, gently pressing with rolling pin to secure.
  11. Place over pears, pressing excess under pears (this forms a border to hold pears when you turn it out).
  12. Bake tart for 30 to 35 minutes or until pastry is puffed and golden.
  13. Stand in pan for 5 minutes.
  14. Whisk cream, and cinnamon together until thick.
  15. Turn tart out onto a 2cm-deep plate. Cut into wedges. Serve warm or at room temperature with cream.
Note: Tarte tatin is a famous French upside down tart traditionally made with apples. Serve warm with cream or vanilla ice-cream.


Get paid to review my post - Read here for more details.

Tuesday, July 8, 2008

Orange & Poppy Seed Cake

I always thought poppy seeds were banned in Malaysia. The version I've heard is that the country has strict regulations against substances that may cause anyone to suffer from symptoms of extreme-happiness. Poppy seeds were one of them. So for the longest time, I've never had anything to do with poppy seeds.

Of course, this could be totally fictional and Mom might have been lying to me all my life but hey, all is well. I love Mom too much to care.

The recipe is from my bible: Donna Hay's Modern Classics Book 2. I'd borrowed it from my former workplace. But I now take that it was a gift. Again, I believe that I'm doing it justice by having its pages covered in batter. Better batter than dust I'd say. I'm sure Donna would appreciate that too. The eggs agrees ---

Orange & Poppy Seed Cake (serves 8 - 10)
---------------------------------------------------------------------------
  • 1/3 cup poppy seeds
  • 3/4 cup milk
  • 200g butter, softened
  • 1 tbsp finely grated orange rind
  • 3/4 cup caster sugar
  • 3 eggs
  • 2 cups plain flour
  • 1 1/2 tsp baking powder
  • 1/2 cup freshly squeezed orange juice

syrup
  • 1 cup sugar
  • 1 cup freshly squeezed orange juice
  • 1/2 cup shredded orange rind

Method:
  1. Preheat oven to 160*c.
  2. Place milk and poppy seeds in a bowl and stir to combine. Set aside.
  3. Beat butter, orange rind, and sugar until light and fluffy.
  4. Add eggs one at a time. Make sure each egg is fully incorporated before putting in the next.
  5. Sift the flour and baking powder into the mixture.
  6. Add orange juice, poppy seed & milk mixture into the batter.
  7. Spoon into a 20cm round cake tin.
  8. Bake for 55 - 60 minutes or until cook when tested with skewer.

Syrup
  1. While cake is baking, place sugar, orange juice and rind in a saucepan over low heat.
  2. Stir until sugar is dissolved.
  3. Increase heat and boil for 5 - 6 minutes or until syrupy.
  4. Pour half of the hot syrup over the hot cake.
  5. To serve, cut the warm / cold cake and pour over remaining syrup.


Get paid to review my post - Read here for more details.

Monday, July 7, 2008

Review My Post


You want to know something weird? You get paid for reviewing a post on my blog.

It's true, you get paid - $7.50 to be exact - for writing something on my blog in YOUR blog.

I know
, it's crazy isn't it?

This is a new program by PayPerPost (PPP) which I was talking about a couple days back. When you click on the badge below and sign up with PPP, you get some extra cash. Ka-ching!

What do I get? Well... I get a review from you :D

So, how do we do this again?

Get Free Money (serves 1)
--------------------------------------------------
Ingredients:

  • A computer/ laptop
  • An internet connection
  • A blog
  • Some wits
  • A dog or a cat
Method:
  1. Click on the badge below.
  2. Sign up with PPP (free, and if you write about them, you get a further $20 - ka-ching, ka-ching)
  3. Write a post on your blog reviewing a post on Twenty Something & Cooking (e.g. could be a recipe that you liked / disliked, something interesting I'd said... whatever)
  4. In your post, please include a link to this post. (**Veryyy important**)
  5. Give your dog / cat / fish a belly rub and wait for the money to pop into your bank account.
Too easy.
Click here: